How to install Python 3.6.1 on CentOS 7

CentOS 7 still has Python 2.7 installed out of the box and is used by the system itself to enable the system commands, so let’s not mess with that installation.

Although as a developer I can do a lot with Python 2.7, I really want to utilize the new language features which comes with Python 3. Since Python 3.6 come out in the end of last year, we got even more goodies, such as Literal String Interpolation, or the f-strings, as they are called.

Let’s get started. By the way, this does not break the installation I made in the previous article, so no worries, if you are on the same server installation as the last time.

Prerequisites

  • CentOS 7 server up and running
  • Sudo priviledged user

Install the necessary utilities

As all Linux tutorials out there, first thing is to install the updates. Then I can proceed with the installation of the necessary tools and utilities.

sudo yum update
sudo yum install yum-utils
sudo yum groupinstall development

Now all of the necessary packages have been installed.

Install Python 3.6.1

The standard yum repositories does not yet provide the latest Python release, so I need to install an additional repository, called IUM (Inline with Upstream Stable), which provides the necessary RPM packages.

So, to install IUM repository:

sudo yum install https://centos7.iuscommunity.org/ius-release.rpm

Now with the repository installed, I can proceed to install Python 3.6:

sudo yum install python36u

Now it’s time to check the Python version with (should return Python 3.6.1 at the time of writing):

python3.6 -V

Next up, is pip to manage Python packages, and some development packages.

sudo yum install python36u-pip
sudo yum install python36u-devel

Ready to test:

# This should return the system Python version
python –V
# output:
Python 2.7.5

# This should return the Python 3 version
python3.6 –V
# output:
Python 3.6.1

That’s it. Now I have Python 3.6 ready to run my apps!

Creating a virtualenv

The preferred way to create a new virtualenv in Python 3 is to run (in your project directory):

python3.6 -m venv venv

… where the former venv is the command to create a virtualenv, and the latter venvis the name of the virtualenv.

To activate the virtualenv and start installing packages with pip, run:

. venv/bin/activate
pip install [package_name]
pip install -r requirements.txt

Happy coding!

Building a Scalable Search Architecture

Software projects of all sizes and complexities have a common challenge: building a scalable solution for search. Who has never seen an application use RDBMS SQL statements to run searches? You might be wondering, is this a good solution? As the databases professor at my university used to say, it depends.

Using SQL to run your search might be enough for your use case, but as your project requirements grow and more advanced features are needed—for example, enabling synonyms, multilingual search, or even machine learning—your relational database might not be enough.

Disclaimer: There are nice projects around like PostgreSQL full-text search that might be enough for your use case, and you should certainly consider them.

For this reason and others as well, many projects start using their database for everything, and over time they might move to a search engine like Elasticsearch or Solr.

Building a resilient and scalable solution is not always easy. It involves many moving parts, from data preparation to building indexing and query pipelines. Luckily, this task looks a lot like the way we tackle problems that arise when connecting data.

A common first step is using the application persistence layer to save the documents directly to the database as well as to the search engine. For small-scale projects, this technique lets the development team iterate quickly without having to scale the required infrastructure.

Applications → Search | RDBMS

Figure 1. Direct indexing

While the intuitive approach, known as a distributed transaction, is popular and seems useful, you might encounter consistency problems if one of your writes fails. It also requires both systems to always be available, so no maintenance windows are possible.

If you are interested in knowing more, there is a great article by Martin Kleppmann et al. that describes the existing problems with heterogeneous, distributed transactions. Distributed transactions are very hard to implement successfully, which is why we’ll introduce a log-inspired system such as Apache Kafka®.

We will introduce three different approaches that use Apache Kafka® to help you build scalable and resilient solutions able to handle an increasing number or documents, integrate different sources of information, introduce ontologies and other machine learning approaches such as learning to rank, etc.

Building an indexing pipeline at scale with Kafka Connect

As soon as the number of data points involved in your search feature increases, typically we’ll introduce a broker in between all the involved components. This architectural pattern provides several benefits:

  • Better scalability by allowing multiple data producers and consumers to run in parallel
  • Greater flexibility, maintainability, and changeability by decoupling production from data consumption and allowing all systems to run independently
  • Increased data diversity by allowing ingestion from multiple and diverse sources and eventually providing organization to each of the indexing pipeline steps, such as data unification, normalization, or more advanced processes like integrating ontologies.

Usually, this would look something like the following:
Figure 2. Scaling indexing

Figure 2. Scaling indexing

A collection of agents are responsible for collecting data from the data sources (e.g., relational databases) and storing them in an intermediate broker. Later, another agent or group of agents will collect the data from the brokers and store them in our search engine.

This can be achieved using many different tools, but if you are already using Apache Kafka as your middleware/broker, Kafka Connect is a scalable framework well suited for connecting systems across Kafka. Kafka Connect has the great benefit of simplifying your deployment requirements, as it is bundled with Apache Kafka and its ecosystem.

In case Kafka Connect is new to you, before moving forward, I recommend checking out the Kafka Connect blog series where my colleague Robin Moffatt introduces Kafka Connect with a nice example.

If you visit the Confluent Hub, you’ll also find that there are many connectors, such as the Kafka Connect JDBC connector, Kafka Connect Elasticsearch connector, two Apache-2.0-licensed Solr community connectors, and others created by the community.

The JDBC and Elasticsearch connectors are included in the Confluent Platform, but if you’re using a different Apache Kafka distribution, you can install them by downloading the connectors from the Confluent Hub and following the documentation.

Moving data into Apache Kafka with the JDBC connector

Moving data while adapting it to the requirements of your search product is a common integration point when building infrastructure like the one described in this blog post.

This is usually achieved by implementing some variation of the change data capture pattern, in which the JDBC connector comes into play. This connector can be used as a source (streaming changes from a database into Kafka) or as a sink (streaming data from a Kafka topic into a database). For this use case, we are going to use it as a source connector.

Setting up the connector

The JDBC connector has many powerful features, such as supporting a variety of JDBC data types, detecting CREATE and DELETE TABLE commands, varying polling intervals and, perhaps most notably, copying data incrementally.

The process of moving data works by periodically running SQL queries. To accomplish this, the JDBC connector tracks a set of columns that are used to determine which rows are new, which were updated, etc.

The JDBC connector supports several modes of operation:

  • Incrementing mode works on columns that are always guaranteed to have an increasing integer ID for each new row, such as an auto increment field. Keep in mind this mode can only detect new rows.
  • Timestamp mode works in a similar fashion, but instead of using a monotonically increasing integer column, this mode tracks a timestamp column, capturing any rows in which the timestamp is greater than the time of the last poll. Through this mode, you can capture updates to existing data as well as new data.
    • You should select carefully which column to monitor in this mode, as it will affect how updates and new records are tracked.
  • Combination mode of timestamp and incrementing is very powerful. This mode can track new records as well as updates to existing ones.
  • Custom query: Keep in mind while using this mode that no automatic offset tracking will be performed—custom queries should do that. This mode can become expensive if the query is complex.
  • Bulk data import is a valuable mode for bootstrapping your system, for example.

More details on how to use the JDBC connector can be found in this deep dive post by my colleague Robin Moffatt.

JDBC drivers

The connector relies on the database JDBC driver(s) for its core functionality. The JDBC driver for your database of choice should be installed in the same kafka-connect-jdbc directory as the connector. If you are using a Linux package such as DEB or RPM, this is usually in the /usr/share/java/kafka-connect-jdbc directory. If you’re installing from an archive, this will be in the share/java/kafka-connect-jdbc directory in your installation.

The following is an example configuration that sets up the connector to query the products table of a MySQL database, using the “modified” column for timestamps and “ID” column for primary keys, and writing records to the db-products Kafka topics:

name=mysql-source
connector.class=io.confluent.connect.jdbc.JdbcSourceConnector
tasks.max=10

connection.url=jdbc:mysql://mysql.example.com:3306/my_database
table.whitelist=products

mode=timestamp+incrementing
timestamp.column.name=modified
incrementing.column.name=id

topic.prefix=db-

Schema evolution

Schema evolution is inevitable in all data integration situations, and search is no exception. If the Avro converter is used, the connector will detect when a change on the incoming table schemas happened and manage the interaction with Confluent Schema Registry.

In all likelihood, the schema of your data will change over the life of your application, so using Schema Registry will make it easier for you to adjust and ensure data format consistency, as well as enable data production and consumption to evolve with mode independence.

Things to watch out for with the JDBC connector

A frequent question that comes up with the JDBC connector is selecting the right mode of operation. Although the connector allows you to start from operation modes perfectly suited for initial load bulk mode, it is very important to think, table by table, the best way to import each table’s records into Apache Kafka.

The connector allows you write a custom query to import data into Kafka. If you are planning to use this advanced mode, you should be careful and make sure the performance of your query matches your timing expectations.

Last but not least, remember this connector works by issuing regular SQL queries directly into your database. Always keep an eye on their performance and make sure they run in the expected time to allow your pipeline to function properly.

You can read more about options for integrating data from relational sources into Kafka in No More Silos: How to Integrate Your Databases with Apache Kafka and CDC.

Indexing your documents with the Elasticsearch connector

After you getting your events stored into Apache Kafka, the next logical step for building your initial indexing pipeline is to pull the data from Kafka into Elasticsearch. To do that, you can use the Kafka Connect Elasticsearch connector.

The Kafka Connect Elasticsearch connector has a rich set of features, such as mapping inference and schema evolution. You can find the specific configuration details in the documentation.

Setting up the connector

For an easy way to get started with the Elasticsearch connector, use this configuration:

name=search-indexing-sink
connector.class=io.confluent.connect.elasticsearch.ElasticsearchSinkConnector
tasks.max=1
topics=db-products
key.ignore=true
connection.url=http://localhost:9200
type.name=products

The configuration will pull from a topic name called db-products, created earlier with the JDBC connector. Using a maximum of one task (you can configure more tasks if needed), it will pull the data stored in that topic into a db-products index at an Elasticsearch instance located at http://localhost:9200.

Notes about the Kafka Connect Elasticsearch connector

The Elasticsearch connector is generally straightforward, but there are a few considerations to take note of.

As you might already know, Elasticsearch mappings can be challenging to get right. You need to think carefully about how your data looks for each of the use cases involved because even with dynamic fields, the end result of your queries will depend on how you have configured your analyzers and tokenizers.

The Elasticsearch connector allows you, to a certain degree, to use automatic mapping inference. However, if you are building your search infrastructure, an even better way is to define an index template where you can control exactly how your data is going to be processed internally.

Another issue you might encounter is around retries, which could happen for various reasons (e.g., Elasticsearch is busy or down for maintenance). In such a scenario, the connector will continue to run and retry the unsuccessful operations using an exponential backoff, giving Elasticsearch time to recover.

Wrapping it up

As you can see, it’s easy to use Apache Kafka and Kafka Connect to scale your search infrastructure by connecting different source applications, databases, and your search engine.

This solution uses a single technology stack to create one uniform approach that helps your project integrate different sources and build scalable and resilient search. It is a natural evolution from the initial application-centric setup.

Interested in more?

If you’d like to know more, you can download the Confluent Platform, the leading distribution of Apache Kafka.

Pere Urbón-Bayes is a technology architect for Confluent based out of Berlin, Germany. He has been working with data and has architected systems for more than 15 years as a freelance engineer and consultant. In that role, he focused on data processing and search, helping companies build reliable and scalable data architectures. His work usually sits at the crossroads of infrastructure, data engineers and scientists, ontologists, and product. Previously, he was at Elastic, the company behind Elasticsearch, where he was a member of the Logstash team, helping companies build reliable ingestion pipelines into Elasticsearch. When not working, Pere loves spending time with his lovely wife and kids and training for long-distance races or duathlons.

Open Source Big Data Tools

Data Ingestion

Data Pre-processing

Storage

Distributed File System

Data Analysis

Distributed Architecture

Visualization

Security & Governance

Cluster Management

Application

Support

Build an AI Assistant with Wolfram Alpha and Wikipedia in Python

Wolfram Alpha is a computational search engine that tends to evaluate what the user asks. Imagine asking a question like “What is the current weather in London” or “Who is the president of United State of America”. Wolfram Alpha will be able to evaluate the question and respond with an answer like “15 degrees centigrade” or “Donald Trump”.

Wikipedia, however, is a search engine that unlike Wolfram, does not compute or evaluate the question but rather searches for the keywords in the query. For example, Wikipedia cannot answer the questions like “What is the current weather in London” or “Who is the president of United State of America” but can search for keywords like “Donald Trump” or “London”.

In this tutorial, these two platforms (Wikipedia & Wolfram) will be combined to build an intelligent assistant using python programming language

Things we need

  • Make sure you have python installed

If you prefer using a virtual environment, you can find a tutorial here on how to create one

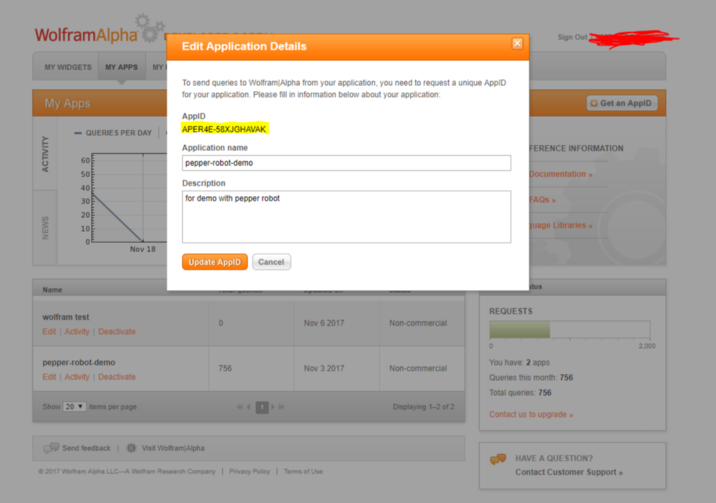
Get Wolfram Alpha App ID

You can register on the Developer’s Portal to create an AppID. (Note: This ID will be deleted)

Wolfram Alpha App ID

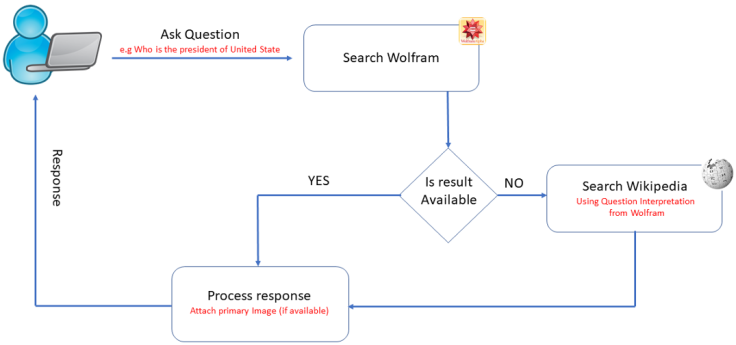
Application Workflow

User’s input will be passed to Wolfram Alpha for processing. if a result is obtained, the result will be returned to the user. If no result is obtained, an interpretation of the input is used as a keyword(s) for Wikipedia query.

Lets start coding

Let’s begin by installing all the required python packages using PIP

pip install wolframalpha
pip install wikipedia
pip install requests
  • Create a python file and open it with any code editor of your choice
  • Import the pre-installed packages
import wolframalpha
import wikipedia
import requests

Implementing Wikipedia Search

Let’s create a function “search_wiki” that takes the keyword as parameter

# method that search wikipedia... 
def search_wiki(keyword=''):
  # running the query
  searchResults = wikipedia.search(keyword)
  # If there is no result, print no result
  if not searchResults:
    print("No result from Wikipedia")
    return
  # Search for page... try block 
  try:
    page = wikipedia.page(searchResults[0])
  except wikipedia.DisambiguationError, err:
    # Select the first item in the list
    page = wikipedia.page(err.options[0])
  #encoding the response to utf-8
  wikiTitle = str(page.title.encode('utf-8'))
  wikiSummary = str(page.summary.encode('utf-8'))
  # printing the result
  print(wikiSummary)

The wikipedia.DisambiguationError occurs when Wikipedia returns multiple results as shown below. Therefore, the first result (at index=0) will be selected

wikipedia.DisambiguationError:

“Trump” may refer to:
Donald Trump
Trump (card games)

Tromp (disambiguation)

Implementing Wolfram Alpha Search

Create an instance of wolfram alpha client by passing the AppID to its class constructor

appId = ‘APER4E-58XJGHAVAK’
client = wolframalpha.Client(appId)

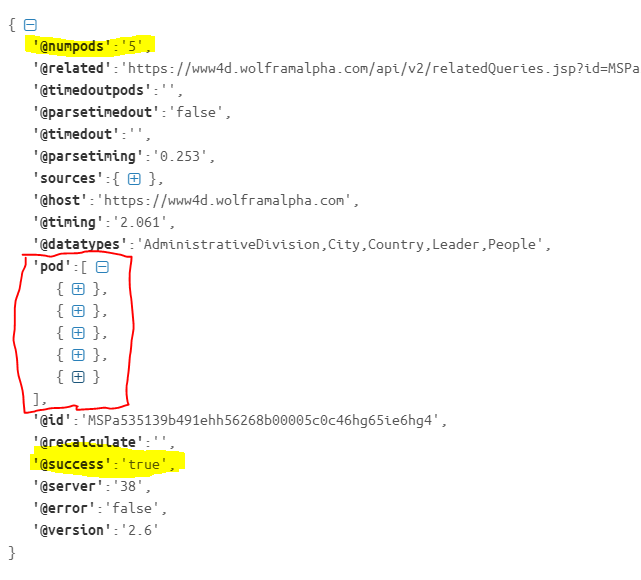
The image below shows a sample response returned by Wolfram Alpha. The important keys are: “@success”, “@numpods” and “pod”

  1. “@success”: This means that Wolfram Alpha was able to resolve the query
  2. “@numpods”: Is the number of results returned
  3. “pod”: Is a list containing the different results. This can also contain “subpods”
Result Sample from Wolfram Query
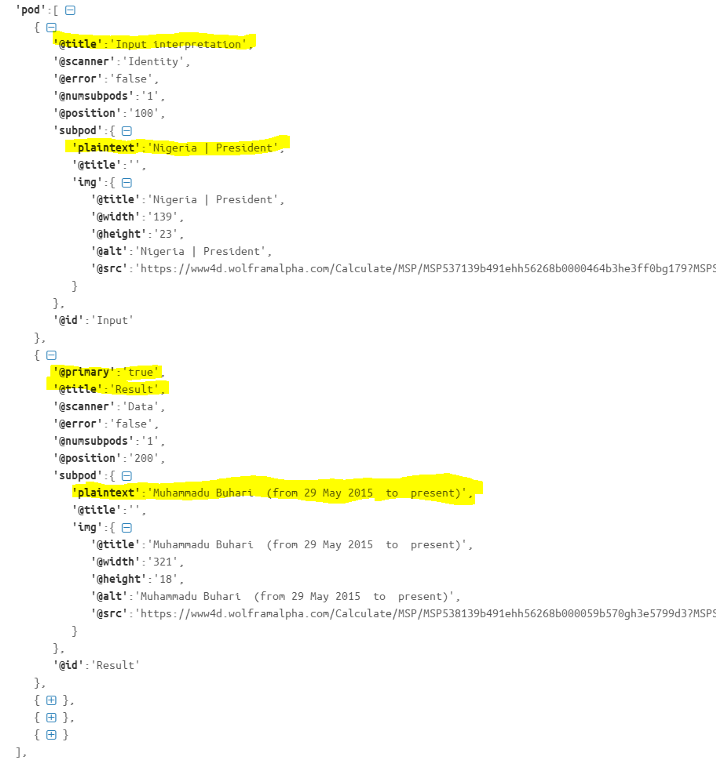
  • The first element of the pod list “pod[0]” is the query interpretation and the first subpod element has a key “plaintext” containing the interpreted result
  • The second element of the pod “pod[1]” is the response that has the highest confidence value (weight). Similarly, It has a subpod with key “plaintext” containing the answers.

Note: Only “pod[1]” with key “primary” as “true” or “title” as “Result or Definition” is considered as the result

You can read more about the “pods” and “subpods” here

So, let’s create a method “search” and pass the “search text” as a parameter.

def search(text=''):
  res = client.query(text)
  # Wolfram cannot resolve the question
  if res['@success'] == 'false':
     print('Question cannot be resolved')
  # Wolfram was able to resolve question
  else:
    result = ''
    # pod[0] is the question
    pod0 = res['pod'][0]
    # pod[1] may contains the answer
    pod1 = res['pod'][1]
    # checking if pod1 has primary=true or title=result|definition
    if (('definition' in pod1['@title'].lower()) or ('result' in  pod1['@title'].lower()) or (pod1.get('@primary','false') == 'true')):
      # extracting result from pod1
      result = resolveListOrDict(pod1['subpod'])
      print(result)
    else:
      # extracting wolfram question interpretation from pod0
      question = resolveListOrDict(pod0['subpod'])
      # removing unnecessary parenthesis
      question = removeBrackets(question)
      # searching for response from wikipedia
      search_wiki(question)

Extracting Item from Pod — Resolving List or Dictionary Issue

If the pod has several subpods, then we select the first element of the subpod and return the value of the key “plaintext”. Else, we just return the value of the key “plaintext”

def resolveListOrDict(variable):
  if isinstance(variable, list):
    return variable[0][‘plaintext’]
  else:
    return variable[‘plaintext’]

Remove Parenthesis (Brackets)

Here, we are splitting the bracket from the text and selecting the first item e.g. “Barack Obama (Politician)” will return “Barack Obama”

def removeBrackets(variable):
  return variable.split(‘(‘)[0]

Enhancing the Search Result with Primary Image

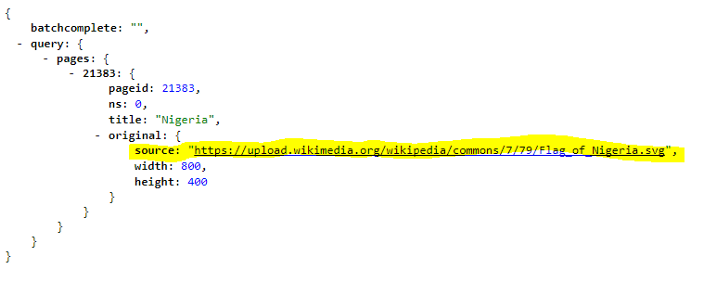
It will be better if we can attach a primary image to the search result. For example, searching for “Albert Einstein” will return both text and his image in the result. To get the primary image of a query from Wikipedia, one needs to access it via a REST endpoint: (titles = Keyword)

https://en.wikipedia.org/w/api.php?action=query&titles=Nigeria&format=json&piprop=original&prop=pageimages
Result format

The “pages” dictionary may contain zero or more items. Usually, the first item is the primary image

def primaryImage(title=''):
    url = 'http://en.wikipedia.org/w/api.php'
    data = {'action':'query', 'prop':'pageimages','format':'json','piprop':'original','titles':title}
    try:
        res = requests.get(url, params=data)
        key = res.json()['query']['pages'].keys()[0]
        imageUrl = res.json()['query']['pages'][key]['original']['source']
        print(imageUrl)
    except Exception, err:
        print('Exception while finding image:= '+str(err))

Full code can be found on GitHub

Running Flask Application Over HTTPS

While you work on your Flask application, you normally run the development web server, which provides a basic, yet functional WSGI complaint HTTP server. But eventually you will want to deploy your application for production use, and at that time, one of the many things you will need to decide is if you should require clients to use encrypted connections for added security.

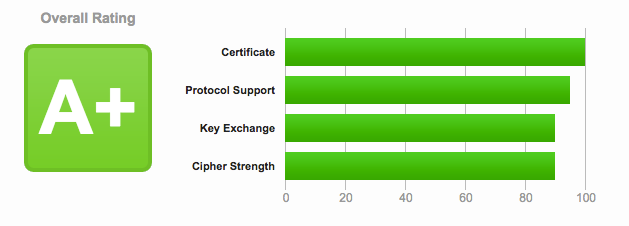
People ask me all the time about this, in particular how to expose a Flask server on HTTPS. In this article I’m going to present several options for adding encryption to a Flask application, going from an extremely simple one that you can implement in just five seconds, to a robust solution that should give you an A+ rating like my site gets from this exhaustive SSL analysis service.
SSL

How Does HTTPS Work?

The encryption and security functionality for HTTP is implemented through the Transport Layer Security (TLS) protocol. Basically put, TLS defines a standard way to make any network communication channel secure. Since I’m not a security expert, I don’t think I can do a great job if I try to give you a detailed description of the TLS protocol, so I will just give you some of the details that are of interest for our purpose of setting up a secure and encrypted Flask server.

The general idea is that when the client establishes a connection with the server and requests an encrypted connection, the server responds with its SSL Certificate. The certificate acts as identification for the server, as it includes the server name and domain. To ensure that the information provided by the server is correct, the certificate is cryptographically signed by a certificate authority, or CA. If the client knows and trusts the CA, it can confirm that the certificate signature indeed comes from this entity, and with this the client can be certain that the server it connected to is legitimate.

After the client verifies the certificate, it creates an encryption key to use for the communication with the server. To make sure that this key is sent securely to the server, it encrypts it using a public key that is included with the server certificate. The server is in possession of the private key that goes with that public key in the certificate, so it is the only party that is able to decrypt the package. From the point when the server receives the encryption key all traffic is encrypted with this key that only the client and server know.

From this summary you can probably guess that to implement TLS encryption we need two items: a server certificate, which includes a public key and is signed by a CA, and a private key that goes with the public key included in the certificate.

The Simplest Way To Do It

Flask, and more specifically Werkzeug, support the use of on-the-fly certificates, which are useful to quickly serve an application over HTTPS without having to mess with certificates. All you need to do, is add ssl_context='adhoc' to your app.run() call. As an example, below you can see the “Hello, World” Flask application from the official documentation, with TLS encryption added:

from flask import Flask
app = Flask(__name__)

@app.route("/")
def hello():
    return "Hello World!"

if __name__ == "__main__":
    app.run(ssl_context='adhoc')

This option is also available through the Flask CLI if you are using a Flask 1.x release:

$ flask run --cert=adhoc

To use ad hoc certificates with Flask, you need to install an additional dependency in your virtual environment:

$ pip install pyopenssl

When you run the script (or start with flask run if you prefer), you will notice that Flask indicates that it is running an https:// server:

$ python hello.py
 * Running on https://127.0.0.1:5000/ (Press CTRL+C to quit)

Simple, right? The problem is that browsers do not like this type of certificate, so they show a big and scary warning that you need to dismiss before you can access the application. Once you allow the browser to connect, you will have an encrypted connection, just like what you get from a server with a valid certificate, which make these ad hoc certificates convenient for quick & dirty tests, but not for any real use.

Self-Signed Certificates

A so called self-signed certificate is one where the signature is generated using the private key that is associated with that same certificate. I mentioned above that the client needs to “know and trust” the CA that signed a certificate, because that trust relationship is what allows the client to validate a server certificate. Web browsers and other HTTP clients come pre-configured with a list of known and trusted CAs, but obviously if you use a self-signed certificate the CA is not going to be known and validation will fail. That is exactly what happened with the ad hoc certificate we used in the previous section. If the web browser is unable to validate a server certificate, it will let you proceed and visit the site in question, but it will make sure you understand that you are doing it at your own risk.
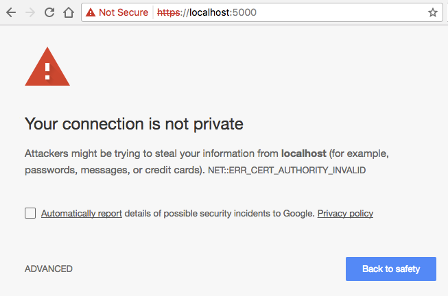
SSLBut what is the risk, really? With the Flask server from the previous section you obviously trust yourself, so there is no risk to you. The problem is when users are presented with this warning when connecting to a site they do not directly know or control. In those cases, it is impossible for the user to know if the server is authentic or not, because anyone can generate certificates for any domain, as you will see below.

While self-signed certificates can be useful sometimes, the ad hoc certificates from Flask are not that great, because each time the server runs, a different certificate is generated on the fly through pyOpenSSL. When you are working with a self-signed certificate, it is better to have the same certificate used every time you launch your server, because that allows you to configure your browser to trust it, and that eliminates the security warnings.

You can generate self-signed certificates easily from the command line. All you need is to have openssl installed:

openssl req -x509 -newkey rsa:4096 -nodes -out cert.pem -keyout key.pem -days 365

This command writes a new certificate in cert.pem with its corresponding private key in key.pem, with a validity period of 365 days. When you run this command, you will be asked a few questions. Below you can see in red how I answered them to generate a certificate for localhost:

Generating a 4096 bit RSA private key
......................++
.............++
writing new private key to 'key.pem'
-----
You are about to be asked to enter information that will be incorporated
into your certificate request.
What you are about to enter is what is called a Distinguished Name or a DN.
There are quite a few fields but you can leave some blank
For some fields there will be a default value,
If you enter '.', the field will be left blank.
-----
Country Name (2 letter code) [AU]:US
State or Province Name (full name) [Some-State]:Oregon
Locality Name (eg, city) []:Portland
Organization Name (eg, company) [Internet Widgits Pty Ltd]:Miguel Grinberg Blog
Organizational Unit Name (eg, section) []:
Common Name (e.g. server FQDN or YOUR name) []:localhost
Email Address []:

We can now use this new self-signed certificate in our Flask application by setting the ssl_context argument in app.run() to a tuple with the filenames of the certificate and private key files:

from flask import Flask
app = Flask(__name__)

@app.route("/")
def hello():
    return "Hello World!"

if __name__ == "__main__":
    app.run(ssl_context=('cert.pem', 'key.pem'))

Alternatively, you can add the --cert and --key options to the flask run command if you are using Flask 1.x or newer:

$ flask run --cert=cert.pem --key=key.pem

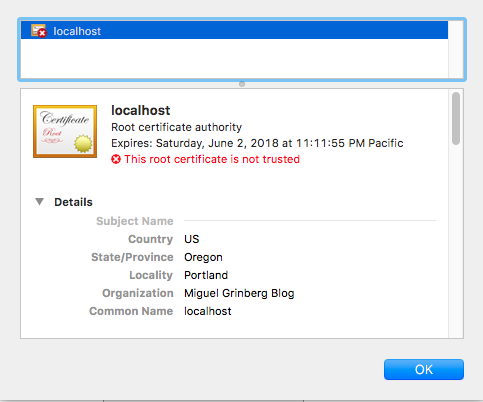
The browser will continue to complain about this certificate, but if you inspect it, you will see the information that you entered when you created it:
SSL

Using Production Web Servers

Of course we all know that the Flask development server is only good for development and testing. So how do we install an SSL certificate on a production server?

If you are using gunicorn, you can do this with command line arguments:

$ gunicorn --certfile cert.pem --keyfile key.pem -b 0.0.0.0:8000 hello:app

If you use nginx as a reverse proxy, then you can configure the certificate with nginx, and then nginx can “terminate” the encrypted connection, meaning that it will accept encrypted connections from the outside, but then use regular unencrypted connections to talk to your Flask backend. This is a very useful set up, as it frees your application from having to deal with certificates and encryption. The configuration items for nginx are as follows:

server {
    listen 443 ssl;
    server_name example.com;
    ssl_certificate /path/to/cert.pem;
    ssl_certificate_key /path/to/key.pem;
    # ...
}

Another important item you need to consider is how are clients that connect through regular HTTP going to be handled. The best solution, in my opinion, is to respond to unencrypted requests with a redirect to the same URL but on HTTPS. For a Flask application, you can achieve that using the Flask-SSLify extension. With nginx, you can include another server block in your configuration:

server {
    listen 80;
    server_name example.com;
    location / {
        return 301 https://$host$request_uri;
    }
}

If you are using a different web server, check their documentation and you will likely find similar ways to create the configurations shown above.

Using “Real” Certificates

We have now explored all the options we have for self-signed certificates, but in all those cases, the limitation remains that web browsers are not going to trust those certificates unless you tell them to, so the best option for server certificates for a production site is to obtain them from one of these CAs that are well known and automatically trusted by all the web browsers.

When you request a certificate from a CA, this entity is going to verify that you are in control of your server and domain, but how this verification is done depends on the CA. If the server passes this verification then the CA will issue a certificate for it with its own signature and give it to you to install. The certificate is going to be good for a period of time that is usually not longer than a year. Most CAs charge money for these certificates, but there are a couple that offer them for free. The most popular free CA is called Let’s Encrypt.

Getting a certificate from Let’s Encrypt is fairly easy, since the whole process is automated. Assuming you are using an Ubuntu based server, you have to begin by installing their open source certbot tool on your server:

$ sudo apt-get install software-properties-common
$ sudo add-apt-repository ppa:certbot/certbot
$ sudo apt-get update
$ sudo apt-get install certbot

And now you are ready to request the certificate using this utility. There are a few ways that certbot uses to verify your site. The “webroot” method is, in general, the easiest to implement. With this method, certbot adds some files in a directory that your web server exposes as static files, and then tries to access these files over HTTP, using the domain you are trying to generate a certificate for. If this test is successful, certbot knows that the server in which it is running it is associated with the correct domain, and with that it is satisfied and issues the certificate. The command to request a certificate with this method is as follows:

$ sudo certbot certonly --webroot -w /var/www/example -d example.com

In this example, we are trying to generate a certificate for a example.com domain, which uses the directory in /var/www/example as a static file root. If certbot is able to verify the domain, it will write the certificate file as /etc/letsencrypt/live/example.com/fullchain.pem and the private key as /etc/letsencrypt/live/example.com/privkey.pem, and these are going to be valid for a period of 90 days.

To use this newly acquired certificate, you can enter the two filenames mentioned above in place of the self-signed files we used before, and this should work with any of the configurations described above. And of course you will also need to make your application available through the domain name that you registered, as that is the only way the browser will accept the certificate as valid.

If you are using nginx as reverse proxy, you can take advantage of the powerful mappings that you can create in the configuration to give certbot a private directory where it can write its verification files. In the following example, I extended the HTTP server block shown in the previous section to send all Let’s Encrypt related requests to a specific directory of your choice:

server {
    listen 80;
    server_name example.com;
    location ~ /.well-known {
        root /path/to/letsencrypt/verification/directory;
    }
    location / {
        return 301 https://$host$request_uri;
    }
}

Certbot is also used when you need to renew the certificates. To do that, you simply issue the following command:

$ sudo certbot renew

If there are any certificates in your system that are close to expire, the above command renews them, leaving new certificates in the same locations. You will likely need to restart your web server if you want the renewed certificates to be picked up.

Achieving an SSL A+ Grade

If you use a certificate from Let’s Encrypt or another known CA for your production site and you are running a recent and maintained operating system on this server, you are likely very close to have a top-rated server in terms of SSL security. You can head over to the Qualys SSL Labs site and get a report to see where you stand.

Chances are you will still have some minor things to do. The report will indicate what areas you need to improve, but in general, I expect you’ll be told that the options the server exposes for the encrypted communication are too wide, or too weak, leaving you open to known vulnerabilities.

One of the areas in which it is easy to make an improvement is in how the coefficients that are used during the encryption key exchange are generated, which usually have defaults that are fairly weak. In particular, the Diffie-Hellman coefficients take a considerable amount of time to be generated, so servers by default use smaller numbers to save time. But we can pre-generate strong coefficients and store them in a file, which then nginx can use. Using the openssl tool, you can run the following command:

openssl dhparam -out /path/to/dhparam.pem 2048

You can change the 2048 above for a 4096 if you want even stronger coefficients. This command is going to take some time to run, specially if your server does not have a lot of CPU power, but when it’s done, you will have a dhparam.pem file with strong coefficients that you can plug into the ssl server block in nginx:

    ssl_dhparam /path/to/dhparam.pem;

Next, you will probably need to configure which ciphers the server allows for the encrypted communication. This is the list that I have on my server:

    ssl_ciphers 'ECDHE-RSA-AES128-GCM-SHA256:ECDHE-ECDSA-AES128-GCM-SHA256:ECDHE-RSA-AES256-GCM-SHA384:ECDHE-ECDSA-AES256-GCM-SHA384:DHE-RSA-AES128-GCM-SHA256:DHE-DSS-AES128-GCM-SHA256:kEDH+AESGCM:ECDHE-RSA-AES128-SHA256:ECDHE-ECDSA-AES128-SHA256:ECDHE-RSA-AES128-SHA:ECDHE-ECDSA-AES128-SHA:ECDHE-RSA-AES256-SHA384:ECDHE-ECDSA-AES256-SHA384:ECDHE-RSA-AES256-SHA:ECDHE-ECDSA-AES256-SHA:DHE-RSA-AES128-SHA256:DHE-RSA-AES128-SHA:DHE-DSS-AES128-SHA256:DHE-RSA-AES256-SHA256:DHE-DSS-AES256-SHA:DHE-RSA-AES256-SHA:AES128-GCM-SHA256:AES256-GCM-SHA384:AES128-SHA256:AES256-SHA256:AES128-SHA:AES256-SHA:AES:CAMELLIA:!DES-CBC3-SHA:!aNULL:!eNULL:!EXPORT:!DES:!RC4:!MD5:!PSK:!aECDH:!EDH-DSS-DES-CBC3-SHA:!EDH-RSA-DES-CBC3-SHA:!KRB5-DES-CBC3-SHA';

In this list, disabled ciphers are prefixed with a !. The SSL report will tell you if there are any ciphers that are not recommended. You will have to check from time to time to find out if new vulnerabilities have been discovered that require modifications to this list.

Below you can find my current nginx SSL configuration, which includes the above settings, plus a few more that I added to address warnings from the SSL report:

server {
    listen 443 ssl;
    server_name example.com;
    ssl_certificate /path/to/cert.pem;
    ssl_certificate_key /path/to/key.pem;
    ssl_dhparam /path/to/dhparam.pem;
    ssl_ciphers 'ECDHE-RSA-AES128-GCM-SHA256:ECDHE-ECDSA-AES128-GCM-SHA256:ECDHE-RSA-AES256-GCM-SHA384:ECDHE-ECDSA-AES256-GCM-SHA384:DHE-RSA-AES128-GCM-SHA256:DHE-DSS-AES128-GCM-SHA256:kEDH+AESGCM:ECDHE-RSA-AES128-SHA256:ECDHE-ECDSA-AES128-SHA256:ECDHE-RSA-AES128-SHA:ECDHE-ECDSA-AES128-SHA:ECDHE-RSA-AES256-SHA384:ECDHE-ECDSA-AES256-SHA384:ECDHE-RSA-AES256-SHA:ECDHE-ECDSA-AES256-SHA:DHE-RSA-AES128-SHA256:DHE-RSA-AES128-SHA:DHE-DSS-AES128-SHA256:DHE-RSA-AES256-SHA256:DHE-DSS-AES256-SHA:DHE-RSA-AES256-SHA:AES128-GCM-SHA256:AES256-GCM-SHA384:AES128-SHA256:AES256-SHA256:AES128-SHA:AES256-SHA:AES:CAMELLIA:!DES-CBC3-SHA:!aNULL:!eNULL:!EXPORT:!DES:!RC4:!MD5:!PSK:!aECDH:!EDH-DSS-DES-CBC3-SHA:!EDH-RSA-DES-CBC3-SHA:!KRB5-DES-CBC3-SHA';
    ssl_protocols TLSv1 TLSv1.1 TLSv1.2;
    ssl_session_timeout 1d;
    ssl_session_cache shared:SSL:50m;
    ssl_stapling on;
    ssl_stapling_verify on;
    add_header Strict-Transport-Security max-age=15768000;
    # ...
}

You can see the results that I obtained for my site at the top of this article. If you are after 100% marks in all categories, you will have to add additional restrictions to your configuration, but this is going to limit the number of clients that can connect to your site. In general, older browsers and HTTP clients use ciphers that are not considered to be the strongest, but if you disable those, then these clients will not be able to connect. So you will basically need to compromise, and also routinely review the security reports and make updates as things change over time.

Unfortunately for the level of sophistication on these last SSL improvements you will need to use a professional grade web server, so if you don’t want to go with nginx, you will need to find one that supports these settings, and the list is pretty small. I know Apache does, but besides that, I don’t know any other.

Simple Chatbot from Scratch in Python

what is a chatbot?

A chatbot is an artificial intelligence-powered piece of software in a device (Siri, Alexa, Google Assistant etc), application, website or other networks that try to gauge consumer’s needs and then assist them to perform a particular task like a commercial transaction, hotel booking, form submission etc .Today almost every company has a chatbot deployed to engage with the users. Some of the ways in which companies are using chatbots are:

  • To deliver flight information
  • to connect customers and their finances
  • As customer support

The possibilities are (almost) limitless.

History of chatbots dates back to 1966 when a computer program called ELIZA was invented by Weizenbaum. It imitated the language of a psychotherapist from only 200 lines of code. You can still converse with it here: Eliza.

Source: Cognizant

How do Chatbots work?

There are broadly two variants of chatbots: Rule-Based and Self learning.

  1. In a Rule-based approach, a bot answers questions based on some rules on which it is trained on. The rules defined can be very simple to very complex. The bots can handle simple queries but fail to manage complex ones.
  2. The Self learning bots are the ones that use some Machine Learning-based approaches and are definitely more efficient than rule-based bots. These bots can be of further two types: Retrieval Based or Generative

i) In retrieval-based models, a chatbot uses some heuristic to select a response from a library of predefined responses. The chatbot uses the message and context of conversation for selecting the best response from a predefined list of bot messages. The context can include a current position in the dialog tree, all previous messages in the conversation, previously saved variables (e.g. username). Heuristics for selecting a response can be engineered in many different ways, from rule-based if-else conditional logic to machine learning classifiers.

ii) Generative bots can generate the answers and not always replies with one of the answers from a set of answers. This makes them more intelligent as they take word by word from the query and generates the answers.

In this article we will build a simple retrieval based chatbot based on NLTK library in python.

Building the Bot

Pre-requisites

A hands-on knowledge of scikit library and NLTK is assumed. However, if you are new to NLP, you can still read the article and then refer back to resources.

NLP

The field of study that focuses on the interactions between human language and computers is called Natural Language Processing, or NLP for short. It sits at the intersection of computer science, artificial intelligence, and computational linguistics[Wikipedia].NLP is a way for computers to analyze, understand, and derive meaning from human language in a smart and useful way. By utilizing NLP, developers can organize and structure knowledge to perform tasks such as automatic summarization, translation, named entity recognition, relationship extraction, sentiment analysis, speech recognition, and topic segmentation.

NLTK: A Brief Intro

NLTK(Natural Language Toolkit) is a leading platform for building Python programs to work with human language data. It provides easy-to-use interfaces to over 50 corpora and lexical resources such as WordNet, along with a suite of text processing libraries for classification, tokenization, stemming, tagging, parsing, and semantic reasoning, wrappers for industrial-strength NLP libraries.

NLTK has been called “a wonderful tool for teaching and working in, computational linguistics using Python,” and “an amazing library to play with natural language.”

Natural Language Processing with Python provides a practical introduction to programming for language processing. I highly recommend this book to people beginning in NLP with Python.

Downloading and installing NLTK

  1. Install NLTK: run pip install nltk
  2. Test installation: run python then type import nltk

For platform-specific instructions, read here.

Installing NLTK Packages

import NLTK and run nltk.download().This will open the NLTK downloader from where you can choose the corpora and models to download. You can also download all packages at once.

Text Pre- Processing with NLTK

The main issue with text data is that it is all in text format (strings). However, the Machine learning algorithms need some sort of numerical feature vector in order to perform the task. So before we start with any NLP project we need to pre-process it to make it ideal for working. Basic text pre-processing includes:

  • Converting the entire text into uppercase or lowercase, so that the algorithm does not treat the same words in different cases as different
  • Tokenization: Tokenization is just the term used to describe the process of converting the normal text strings into a list of tokens i.e words that we actually want. Sentence tokenizer can be used to find the list of sentences and Word tokenizer can be used to find the list of words in strings.

The NLTK data package includes a pre-trained Punkt tokenizer for English.

  • Removing Noise i.e everything that isn’t in a standard number or letter.
  • Removing Stop words. Sometimes, some extremely common words which would appear to be of little value in helping select documents matching a user need are excluded from the vocabulary entirely. These words are called stop words
  • Stemming: Stemming is the process of reducing inflected (or sometimes derived) words to their stem, base or root form — generally a written word form. Example if we were to stem the following words: “Stems”, “Stemming”, “Stemmed”, “and Stemtization”, the result would be a single word “stem”.
  • Lemmatization: A slight variant of stemming is lemmatization. The major difference between these is, that, stemming can often create non-existent words, whereas lemmas are actual words. So, your root stem, meaning the word you end up with, is not something you can just look up in a dictionary, but you can look up a lemma. Examples of Lemmatization are that “run” is a base form for words like “running” or “ran” or that the word “better” and “good” are in the same lemma so they are considered the same.

Bag of Words

After the initial preprocessing phase, we need to transform text into a meaningful vector (or array) of numbers. The bag-of-words is a representation of text that describes the occurrence of words within a document. It involves two things:

•A vocabulary of known words.

•A measure of the presence of known words.

Why is it is called a “bag” of words? That is because any information about the order or structure of words in the document is discarded and the model is only concerned with whether the known words occur in the document, not where they occur in the document.

The intuition behind the Bag of Words is that documents are similar if they have similar content. Also, we can learn something about the meaning of the document from its content alone.

For example, if our dictionary contains the words {Learning, is, the, not, great}, and we want to vectorize the text “Learning is great”, we would have the following vector: (1, 1, 0, 0, 1).

TF-IDF Approach

A problem with the Bag of Words approach is that highly frequent words start to dominate in the document (e.g. larger score), but may not contain as much “informational content”. Also, it will give more weight to longer documents than shorter documents.

One approach is to rescale the frequency of words by how often they appear in all documents so that the scores for frequent words like “the” that are also frequent across all documents are penalized. This approach to scoring is called Term Frequency-Inverse Document Frequency, or TF-IDF for short, where:

Term Frequency: is a scoring of the frequency of the word in the current document.

TF = (Number of times term t appears in a document)/(Number of terms in the document)

Inverse Document Frequency: is a scoring of how rare the word is across documents.

IDF = 1+log(N/n), where, N is the number of documents and n is the number of documents a term t has appeared in.

Tf-idf weight is a weight often used in information retrieval and text mining. This weight is a statistical measure used to evaluate how important a word is to a document in a collection or corpus

Example:

Consider a document containing 100 words wherein the word ‘phone’ appears 5 times.

The term frequency (i.e., tf) for phone is then (5 / 100) = 0.05. Now, assume we have 10 million documents and the word phone appears in one thousand of these. Then, the inverse document frequency (i.e., IDF) is calculated as log(10,000,000 / 1,000) = 4. Thus, the Tf-IDF weight is the product of these quantities: 0.05 * 4 = 0.20.

Tf-IDF can be implemented in scikit learn as:

from sklearn.feature_extraction.text import TfidfVectorizer

Cosine Similarity

TF-IDF is a transformation applied to texts to get two real-valued vectors in vector space. We can then obtain the Cosine similarity of any pair of vectors by taking their dot product and dividing that by the product of their norms. That yields the cosine of the angle between the vectors. Cosine similarity is a measure of similarity between two non-zero vectors. Using this formula we can find out the similarity between any two documents d1 and d2.

Cosine Similarity (d1, d2) =  Dot product(d1, d2) / ||d1|| * ||d2||

where d1,d2 are two non zero vectors.

For a detailed explanation and practical example of TF-IDF and Cosine Similarity refer the document below.

Now we have a fair idea of the NLP process. It is time that we get to our real task i.e Chatbot creation. We will name the chatbot here as ‘ROBO🤖

Importing the necessary libraries

import nltk
import numpy as np
import random
import string # to process standard python strings

Corpus

For our example,we will be using the Wikipedia page for chatbots as our corpus. Copy the contents from the page and place it in a text file named ‘chatbot.txt’. However, you can use any corpus of your choice.

Reading in the data

We will read in the corpus.txt file and convert the entire corpus into a list of sentences and a list of words for further pre-processing.

f=open('chatbot.txt','r',errors = 'ignore')
raw=f.read()
raw=raw.lower()# converts to lowercase
nltk.download('punkt') # first-time use only
nltk.download('wordnet') # first-time use only
sent_tokens = nltk.sent_tokenize(raw)# converts to list of sentences 
word_tokens = nltk.word_tokenize(raw)# converts to list of words

Let see an example of the sent_tokens and the word_tokens

sent_tokens[:2]
['a chatbot (also known as a talkbot, chatterbot, bot, im bot, interactive agent, or artificial conversational entity) is a computer program or an artificial intelligence which conducts a conversation via auditory or textual methods.',
 'such programs are often designed to convincingly simulate how a human would behave as a conversational partner, thereby passing the turing test.']
word_tokens[:2]
['a', 'chatbot', '(', 'also', 'known']

Pre-processing the raw text

We shall now define a function called LemTokens which will take as input the tokens and return normalized tokens.

lemmer = nltk.stem.WordNetLemmatizer()
#WordNet is a semantically-oriented dictionary of English included in NLTK.
def LemTokens(tokens):
    return [lemmer.lemmatize(token) for token in tokens]
remove_punct_dict = dict((ord(punct), None) for punct in string.punctuation)
def LemNormalize(text):
    return LemTokens(nltk.word_tokenize(text.lower().translate(remove_punct_dict)))

Keyword matching

Next, we shall define a function for a greeting by the bot i.e if a user’s input is a greeting, the bot shall return a greeting response.ELIZA uses a simple keyword matching for greetings. We will utilize the same concept here.

GREETING_INPUTS = ("hello", "hi", "greetings", "sup", "what's up","hey",)
GREETING_RESPONSES = ["hi", "hey", "*nods*", "hi there", "hello", "I am glad! You are talking to me"]
def greeting(sentence):

for word in sentence.split():
if word.lower() in GREETING_INPUTS:
return random.choice(GREETING_RESPONSES)

Generating Response

To generate a response from our bot for input questions, the concept of document similarity will be used. So we begin by importing necessary modules.

  • From scikit learn library, import the TFidf vectorizer to convert a collection of raw documents to a matrix of TF-IDF features.
from sklearn.feature_extraction.text import TfidfVectorizer
from sklearn.metrics.pairwise import cosine_similarity

This will be used to find the similarity between words entered by the user and the words in the corpus. This is the simplest possible implementation of a chatbot.

We define a function response which searches the user’s utterance for one or more known keywords and returns one of several possible responses. If it doesn’t find the input matching any of the keywords, it returns a response:” I am sorry! I don’t understand you”

def response(user_response):
    robo_response=''
    sent_tokens.append(user_response)
    TfidfVec = TfidfVectorizer(tokenizer=LemNormalize, stop_words='english')
    tfidf = TfidfVec.fit_transform(sent_tokens)
    vals = cosine_similarity(tfidf[-1], tfidf)
    idx=vals.argsort()[0][-2]
    flat = vals.flatten()
    flat.sort()
    req_tfidf = flat[-2]
    if(req_tfidf==0):
        robo_response=robo_response+"I am sorry! I don't understand you"
        return robo_response
    else:
        robo_response = robo_response+sent_tokens[idx]
        return robo_response

Finally, we will feed the lines that we want our bot to say while starting and ending a conversation depending upon user’s input.

flag=True
print("ROBO: My name is Robo. I will answer your queries about Chatbots. If you want to exit, type Bye!")
while(flag==True):
    user_response = input()
    user_response=user_response.lower()
    if(user_response!='bye'):
        if(user_response=='thanks' or user_response=='thank you' ):
            flag=False
            print("ROBO: You are welcome..")
        else:
            if(greeting(user_response)!=None):
                print("ROBO: "+greeting(user_response))
            else:
                print("ROBO: ",end="")
                print(response(user_response))
                sent_tokens.remove(user_response)
    else:
        flag=False
        print("ROBO: Bye! take care..")

So that’s pretty much it. We have the coded our first chatbot in NLTK. You can find the entire code with the corpus here.

Python Libraries for Data Science

We will look at some of the Python libraries for data science tasks other than the commonly used ones like pandas, scikit-learn, matplotlib etc. Although the libraries like pandas and scikit-learn are the default names which come to mind for machine learning tasks, it’s always good to learn about other python offerings in this field.

Wget

Extracting data especially from the web is one of the vital tasks of a data scientist. Wget is a free utility for non-interactive download of files from the Web. It supports HTTP, HTTPS, and FTP protocols, as well as retrieval through HTTP proxies. Since it is non-interactive, it can work in the background even if the user isn’t logged in. So the next time you want to download a website or all the images from a page, wget is there to assist you.

Installation :

$ pip install wget

Example:

import wget
url = 'http://www.futurecrew.com/skaven/song_files/mp3/razorback.mp3'
filename = wget.download(url)
100% [................................................] 3841532 / 3841532
filename
'razorback.mp3'

Pendulum

For the ones, who get frustrated when working with date-times in python, Pendulum is here for you. It is a Python package to ease datetimes manipulations. It is a drop-in replacement for the Python’s native class. Refer to the documentation for in-depth working.

Installation:

$ pip install pendulum

Example:

import pendulum
dt_toronto = pendulum.datetime(2012, 1, 1, tz='America/Toronto')
dt_vancouver = pendulum.datetime(2012, 1, 1, tz='America/Vancouver')
print(dt_vancouver.diff(dt_toronto).in_hours())
3

imbalanced-learn

It is seen that most classification algorithms work best when the number of samples in each class is almost the same, i.e. balanced. But real life cases are full of imbalanced datasets which can have a bearing upon the learning phase and the subsequent prediction of machine learning algorithms. Fortunately, this library has been created to address this issue. It is compatible with scikit-learn and is part of scikit-learn-contrib projects. Try it out the next time when you encounter imbalanced datasets.

Installation:

pip install -U imbalanced-learn
# or
conda install -c conda-forge imbalanced-learn

Example:

For usage and examples refer documentation.

FlashText

Cleaning text data during NLP tasks often requires replacing keywords in sentences or extracting keywords from sentences. Usually, such operations can be accomplished with regular expressions, but it could become cumbersome if the number of terms to be searched ran into thousands. Python’s FlashText module, which is based upon the FlashText algorithm provides an apt alternative for such situations. The best part of FlashText is that the runtime is the same irrespective of the number of search terms. You can read more about it here.

Installation:

$ pip install flashtext

Example:

Extract keywords

from flashtext import KeywordProcessor
keyword_processor = KeywordProcessor()
# keyword_processor.add_keyword(<unclean name>, <standardised name>)
keyword_processor.add_keyword('Big Apple', 'New York')
keyword_processor.add_keyword('Bay Area')
keywords_found = keyword_processor.extract_keywords('I love Big Apple and Bay Area.')
keywords_found
['New York', 'Bay Area']

Replace keywords

keyword_processor.add_keyword('New Delhi', 'NCR region')
new_sentence = keyword_processor.replace_keywords('I love Big Apple and new delhi.')
new_sentence
'I love New York and NCR region.'

For more usage examples, refer the official documentation.

Fuzzywuzzy

The name does sound weird, but fuzzywuzzy is a very helpful library when it comes to string matching. One can easily implement operations like string comparison ratios, token ratios etc. It is also handy for matching records which are kept in different databases.

Installation:

$ pip install fuzzywuzzy

Example:

from fuzzywuzzy import fuzz
from fuzzywuzzy import process
# Simple Ratio
fuzz.ratio("this is a test", "this is a test!")
97
# Partial Ratio
fuzz.partial_ratio("this is a test", "this is a test!")
 100

More interesting examples can be found at their GitHub repo.

PyFlux

Time series analysis is one of the most frequently encountered problems in Machine learning domain. PyFlux is an open source library in Python explicitly built for working with time series problems. The library has an excellent array of modern time series models including but not limited to ARIMA, GARCH and VAR models. In short, PyFlux offers a probabilistic approach to time series modelling. Worth trying out.

Installation

pip install pyflux

Example

Please refer the documentation for usage and examples.

Ipyvolume

Communicating results is an essential aspect of Data Science. Being able to visualise results comes at a significant advantage. IPyvolume is a Python library to visualise 3d volumes and glyphs (e.g. 3d scatter plots), in the Jupyter notebook, with minimal configuration and effort. However, it is currently in the pre-1.0 stage. A good analogy would be something like this: IPyvolume’s volshow is to 3d arrays what matplotlib’s imshow is to 2d arrays. You can read more about it here.

Using pip
$ pip install ipyvolume
Conda/Anaconda
$ conda install -c conda-forge ipyvolume

Example

  • Animation
  • Volume Rendering

Dash

Dash is a productive Python framework for building web applications. It is written on top of Flask, Plotly.js, and React.js and ties modern UI elements like dropdowns, sliders, and graphs to your analytical Python code without the need for javascript. Dash is highly suitable for building data visualisation apps. These apps can then be rendered in the web browser. The user guide can be accessed here.

Installation

pip install dash==0.29.0  # The core dash backend
pip install dash-html-components==0.13.2  # HTML components
pip install dash-core-components==0.36.0  # Supercharged components
pip install dash-table==3.1.3  # Interactive DataTable component (new!)

Example

The example below shows a highly interactive graph with drop down capabilities. As the user selects a value in the Dropdown, the application code dynamically exports data from Google Finance into a Pandas DataFrame. Source

Gym

Gym from OpenAI is a toolkit for developing and comparing reinforcement learning algorithms. It is compatible with any numerical computation library, such as TensorFlow or Theano. The gym library is necessarily a collection of test problem also called environments — that you can use to work out your reinforcement learning algorithms. These environments have a shared interface, allowing you to write general algorithms.

Installation

pip install gym

Example

An example that will run an instance of the environment CartPole-v0 for 1000 timesteps, rendering the environment at each step.

You can read about other environments here.

Augmented Reality(AR) Navigation App

Augmented Reality (AR) makes the real-life environment around us into a digital interface by putting virtual objects in real-time. Augmented Reality uses the existing environment and overlays new information on the top of it unlike virtual reality, which creates a totally artificial environment. Augmented Reality can be seen through a variety of experiences. Recent developments have made this technology accessible using a smartphone which led to development of wide variety of augmented reality apps.

Augmented Reality Apps are software applications which merge the digital visual (audio and other types also) content into the user’s real-world environment. There are various uses of AR software like training, work and consumer applications in various industries including public safety, healthcare, tourism, gas and oil, and marketing.

Augmented Reality in Browsers:

The AR browsers can enhance users’ camera display with contextual information. For example, when you point your smartphone at a location, you can see nearby place and their review ratings.

markerless

Augmented Reality GPS:

AR applications in smartphones generally include Global Positioning System (GPS) to spot the user’s location and its compass to detect device orientation.

Examples: AR GPS Compass Map 3D, AR GPS Drive/Walk
Navigation, etc.

Octagon-Studio_The-Use-of-AR_Weareendpointcom

AR GPS Drive/Walk Navigation:

The application makes use of the smartphone’s GPS and camera to execute a car navigation system with
an augmented reality-powered technology. It is easier and safer than the normal navigation system for the driver. This application is available only on Android.

This app guides the drivers directly by the virtual path of the camera preview video which makes it easy for them to understand. The drivers do not need to map the map the path and the road while using this app. The driver can see the real-time camera preview navigation screen to get driving condition without hindering his safety.

CONCLUSION

Augmented Reality is a technology that has changed the face of smartphone apps and gaming. AR adds digital images and data to amplify views of the real world, giving users more information about their environments. This step is beyond virtual reality, which attempts to simulate reality. AR apps are growing at a tremendous speed as they give businesses a different edge which attracts the customers.


Everything Under One Social Media App

UNITE

Like many people today, each of us might have more than one social media account. An account for Facebook, Twitter, Tumblr, Instagram and more. Thus, you have separate apps for each of them in your smartphone. How about keeping them all not in a folder but as an app? Unite is that app. This app keeps all of your social media streams under one place. You can even use this app to post messages, tag location, add photos and videos and more using the same app. You can view all the streams in one feed or swipe to access them individually.

Combines all your social feeds into a single app may eventually saves opening each app separately, saves storage space of individual installed apps along with  smartphone RAM memory .

Features

App is an innovation for users who are immensely connected on social networking website on their Smartphones.

  • View all of your social media streams from Facebook, Twitter, Instagram and Tumblr in one elegant feed, so you’ll never miss that game-changing tweet or controversial blog post.
  • Share content across all of your social accounts from one intuitive window, without having to rewrite your post for each platform. Tag your location in Tweets and add images and video in a simple, yet beautiful user interface.

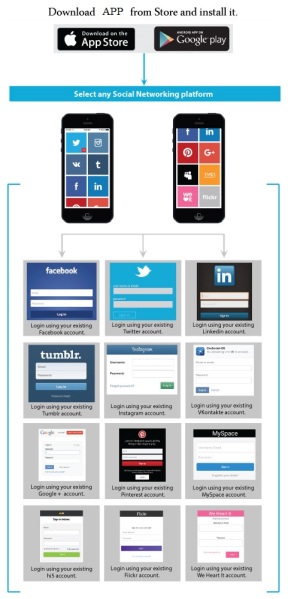
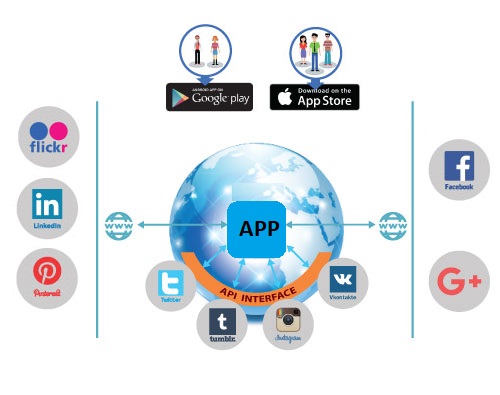
App consolidates all the major Social Networking platforms, such as “Facebook, Twitter, Instagram, LinkedIn, Tumblr, Pinterest, youtube, Google+ and SoundCloud” at single place making it easy for Smartphone users to access their multiple social accounts from single mobile application. App directly connects with social networking platforms through their official APIs to display the information of user’s social accounts after authentication through their social account credentials.one_social_help.png.jpg

App does not require any separate registration to access the applications. Users just need to login using their authenticated credentials for each social platform individually. On successful login, you will be able to view all your account information and updates.

The application provides simple, user-friendly interface for Twitter, Instagram, tumblr which maintains the same native social networking environment for each platform giving the known feeling to users like they access these social networking apps individually on their device. For rest of the platforms application will allow user to access their social networks through mobile website.

.App gives instant updates to users on new Posts/Blogs, Comments, Likes, Favorites etc. of Twitter, Instagram, tumblr social network accounts via Push Notifications feature. No matter if user is using the application or not, the application gives instant updates and count of updates for each social platform.

 
  • Integrates with following major social networking platforms i.e.

Facebook, Twitter, Instagram, LinkedIn, Tumblr, Pinterest, Flickr, Google+, Youtube, Pinterest

  • Access multiple social accounts from single application.
  • No separate registration is required. User will login using their existing social media account credentials.
  • Get instant notifications for one or multiple social accounts
  • View count of update notifications received for different social platforms.
  • Security of user’s information as application directly gets user’s account information from official APIs & official website of each social platform.

Solution Architecture

Application directly integrates official APIs of social networking platforms (Twitter, Instagram, Tumblr i.e. No intermediate server is part of the solution. The application directly brings user updates through official APIs of these social platforms. Other social networking platforms are integrated with the mobile app using WebView because the API for those platforms is not available. A “Webview” is a browser bundled inside of a mobile application producing what is called a hybrid app. Using a webview allows mobile apps to be built using Web technologies (HTML, JavaScript, CSS, etc.) but still package it as a native app and put it in the app store. WebView is the part of the Android OS responsible for rendering web pages in most Android apps. If you see web content in an Android app, chances are you’re looking at a WebView. The major exception to this rule is Google Chrome for Android, which instead uses its own rendering engine, built into the app

one_social_architecture.png

Through this solution architecture, we make sure that user’s social account information (data) is secure and user’s account data is not stored and managed on any intermediate server. The application directly communicates with respective social sites keeping .Social application and social networking sites work in sync.

Facebook wouldn’t approve the newsfeed permission. As permission was being restricted to OEMs and would be discontinued for anyone already using it. We don’t receive the newsfeed directly. App only gets posts from the user’s liked pages, so it’s allows by pulling it off via an RSS.

competitors

There are a couple of similar aggregators in the market like HootSuite and Buffer. They are not necessarily competitors as they’re more targeted at businesses rather than consumers or posters. I’ve always found with those type of apps is that they’re great for interacting with customers and tracking specific keywords but if you’re using them for casual browsing of personal accounts, the experience isn’t nearly as pleasant as the official apps.

Read More: other social media-management alternatives to consider , The 10 Best Social Media Management Applications

Use of Big Data Analytics

In recent times, the power of Big Data is information about people’s behavior instead of information about their beliefs. It’s about the behavior of customers, employees, and prospects for your new business. It’s not about the things you post on Facebook, and it’s not about your searches on Google, which is what most people think about, and it’s not data from internal company processes and RFIDs. This sort of Big Data comes from things like location data off of your cell phone or credit card, it’s the little data breadcrumbs that you leave behind you as you move around in the world.

Healthcare

Healthcare has progressed over the years helping people live a longer life, all this is thanks to the amount of big data we have been collecting and experimenting with. We have been able to create self-learning healthcare programs, which are able to work on data of individual patients: along with gender, age, weight, and medical history, also lifestyle, habits, preferences and we will be able to provide a personalized recommendation about adjustments that will be most beneficial.

Deloitte_fig6

Today most people are looking to buy fitness trackers and download health apps – these are helping people lead an active life, eat healthier and control their weight – and this is only the beginning. These devices are actively monitoring heart rate, sleeping patterns and other vital signs that can be used to serve other healthcare purposes and predict overall public health sentiment. With so much data, we might be able to prevent an epidemic before it taking place.

Logistics

Thanks to data, virtually everything in our environment is running smoothly. Improved logistics is not always visible to the public, but the impact is immense.

Airlines are able to schedule flights, predict delays based on weather data and estimate the demand for seats required based on seasonal fluctuations, competition analysis, latest societal trends or events. Also, they are able to accurately predict the number of planes required in the future.

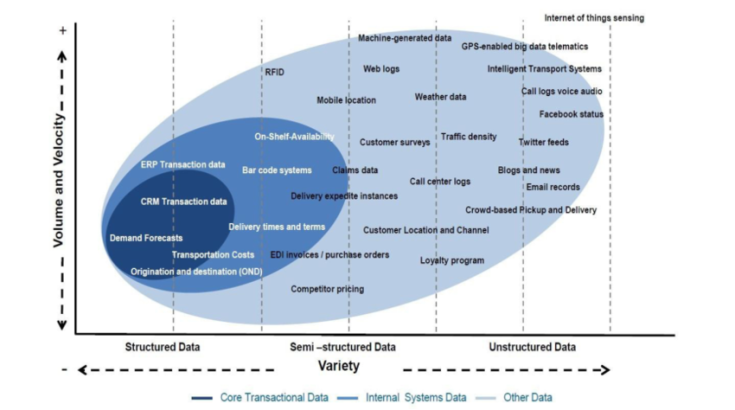
SCM-Data-volume-and-velocity-vs-variety.png

Delivery companies such as DHL, FedEx, etc use big data science to improve their delivery times, leading to higher operational efficiency. You get correct delivery estimates even when you are ordering from another country – this is impossible without processing and analyzing large volumes of data for best solutions.

Face Recognition

Facial recognition algorithms were discovered a decade ago, but they would mistake the human face for all sorts of things – animals, some graffiti etc. Now with more and more data fueling it, the algorithms have been learning and now it is close to perfect.

Today iPhone X has come up with a face unlock feature wherein it can even recognize twins. It enables Facebook to give you suggestions on tagging friends, it activates goofy filters in Snapchat, Instagram. Going forward, facial recognition can be a powerful tool of law enforcement.

Self-Driving Cars

Driverless cars considered a dream earlier is only possible today because of the vast amounts of big data we can process. It is estimated that one driverless car produces close to 1 GB of data per second, which equals petabytes of data a year, that too from one vehicle.

car-infographic

Apart from the sensors that collect and process data real-time (radar, video cameras, GPS, ultrasonic sensors, etc.), self-driving cars also use data from other cars. It helps them to build an up-to-date roadmap and navigation is through all these data sources. It is similar to how we use Google Maps to navigate our way through the least congested or fastest route. Then there is machine learning that helps cars to predict a critical situation based on the data it collects. This is the reason why every driverless car company is letting their cars explore the streets of the world before getting into mass production.

If you look around you will find more such examples of data analytics changing your everyday life.


Create a website or blog at WordPress.com

Up ↑

Design a site like this with WordPress.com
Get started